I hope everyone has a blessed Easter Sunday. We all have so much to be thankful for. While in town this morning I saw a small band of actors dressed in Bible times clothing, The one playing Jesus had a white robe and carried a cross. He fell and someone lashed out at him with a rope. It was very impressive to see that on a busy street.
I am posting these cut angel earrings I made. You can see more pictures on my etsy site or facebook page, CraftedWithStyle. Thanks for stopping by. I would love to read a comment.
WELCOME
Thanks for stopping by. Please bookmark and come back often. I will be adding more things as time permits. I love and thrive on your comments, so please sign in and leave them often. Sign up for email notices and you will recieve an email each time I post something new. You have a blessed day!
Friday, March 29, 2013
Friday, October 21, 2011
Tic Tac Toe Game
This is the old fashion game we use to draw on a peice of paper and play with a pencil, marking the squares with O's and X's. I made this one to go on my coffee table. It makes for a quick fun game to play right before supper time, by children and adults as well. For special customers, I paint a folk like painting of thier house from a photo on the lower right hand side.Wednesday, October 19, 2011
Wednesday, September 7, 2011
Tuesday, February 8, 2011
Gold Fish Block
This is a quilt block piece I put together with scraps of fabric saved from other projects. Just a tiny piece of orange I saved and so glad I did. I hate to throw away any bit of scrapes I have left over. They always come in handy someday. I made the eyes out of black sequins and the air bubbles out of tiny pearl beads, which you can see better in the close up photo below.
Monday, February 7, 2011
Lady Bug
I got this cute pattern for a pin cushion, from Craft nThings magazine. You can go to their website craftnthings.com and get the free pattern. Just click on the February 2011 magazine, then free pattern , Lovely Ladybug. I modified the pattern to suit my taste, and ease of construction such as using felt instead of fabric. I left one piece of the pattern out, because I could not figure out where it went, LOL
Sunday, February 6, 2011
Goblet Glass or Cup Charms Tutorial
These little charms are great to put on any glass with a stem to help your guest identify their glass. Can even be used on coffee mugs. It only takes a few minutes to make and they make much appreciated hostess gifts.
All thats needed, are a small pair of plyers with a cutting edge and round on the end, as shown in photo above, 4 inch piece of memory wire, 8-7mm beads and a charms of your choice. I chose a small leaf for mine,
Step 1. Cut a four inch piece of memory wire. Using your plyers, make a small round turn on one end of the wire. This keeps your beads from fall off.
Step 4. Place remaining 4 beads on the wire. Next, take your plyers as before, and make a small turn on the wire to hold your beads in place.
Step 5. With your fingers manipulate the wire into a round circle and, wala... you now have a charm that eaisly slips onto the glass stem.
Friday, January 28, 2011
Flower Earrings
Antique looking, they resemble a Morning Glory flower, one of my favorites. I make then in different colors.
Friday, January 14, 2011
Memories Box
I wanted to show you this unpainted box I bought at Hobby Lobby. I painted it with acrylic paints and added two coats of varnish. Everyone knows I love sheet music soooo, I lined the inside of the drawers with sheet music, using mod podge, as a glue and finish over the paper.
If you happen upon my blog, please encourage me and leave a comment. I promise to read each and everyone. Thank you.
Friday, September 17, 2010
Cleome Flowers
CLEOME FLOWER
This beautuful flower is know to have grown on the plantation of Thomas Jefferson. It is also know as, Spider Flower. It is a delicate lavender, pink and white in color. It can grow up to 5 foot, but mine usually grows about 4 feet and is in part shade. You can winter sow them or plant in early spring. Once you get a start, you can let them self sow. They bloom for a long time in the summer..
I have already collected some seed and would like to share them with other gardeners. I am offering them for $1.00, plus a stamped, self addressed envelope. You will get about 100 seeds. Supplies are limited, so please email me first.
Tuesday, September 14, 2010
Tissue Flowers
These facial tissue flowers make up quickly, and look soft and silky in a vase. Use 2 ply tissues and the color of your choice. I used white here because that's the color I had on hand. They look pretty alone, but you can use an opitional felt leaf glued to the back. Your imagination can go wild making these things but they are so much fun, and make quick flowers for any room of the house.

Some materials you will need
You will need 2 ply facial tissue, thin wire, floral stem, floral tape, glue gun, sicissors and Opitional green felt for leaves if you decide to use them.
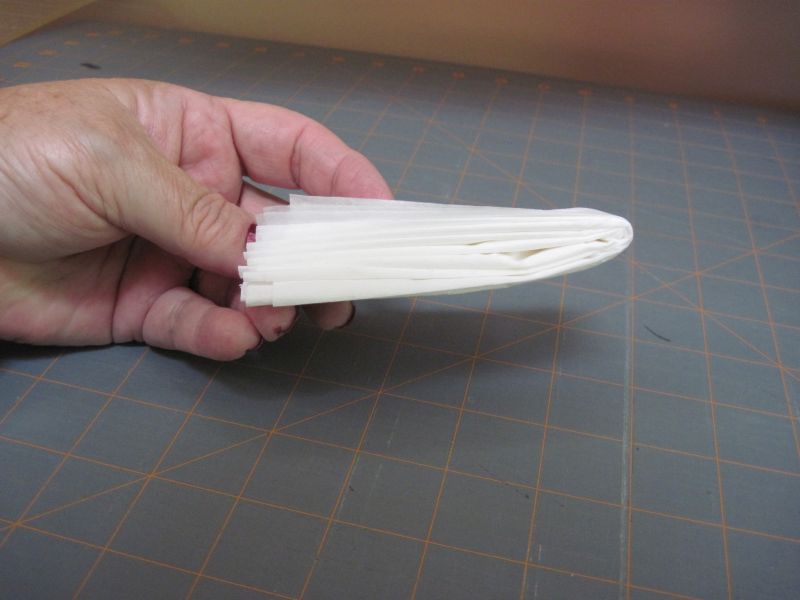
Step one: Take a tissue and fold it acordian style.
Step 2 Fold the folded tissue in half.
Step 3, Cut half folded tissue in a V shape on each side, being careful not to cut all the way through the tissue fold.
Step 4, Cut a piece of thin wire, and wrap tightly around the V cut. Leave a long tail on the wire to wrap around the floral stem later.
Step 5, Next, cut the other end of the tissue in order to seperate the petals.
Step 6, Now, gently pull the tissue plies apart.
Step 7, After you gently pull apart all the tissue, fluff gently upward, and presto! Your flower is now ready to attach to the floral stem. You can now glue the opitional green felt leaf to the flower, or proceed to wrap the thin wire around the floral stem. Make a loop on the end of the floral stem after you wrap the thin wire to it. This helps the flower to stay in place. Then continue to wrap wire around the stem. You can cover the thin wire and floral stem with floral tape for a uniform look.
You can add two or three flowers together to make a pretty arrangement.
Step 8, Place flower arrangement into a pretty vase. I set mine on my bedroom night stand.
I hope you enjoy these as much as I do.

Some materials you will need
Step one: Take a tissue and fold it acordian style.
Step 2 Fold the folded tissue in half.
Step 4, Cut a piece of thin wire, and wrap tightly around the V cut. Leave a long tail on the wire to wrap around the floral stem later.
Step 5, Next, cut the other end of the tissue in order to seperate the petals.
Step 6, Now, gently pull the tissue plies apart.
Step 7, After you gently pull apart all the tissue, fluff gently upward, and presto! Your flower is now ready to attach to the floral stem. You can now glue the opitional green felt leaf to the flower, or proceed to wrap the thin wire around the floral stem. Make a loop on the end of the floral stem after you wrap the thin wire to it. This helps the flower to stay in place. Then continue to wrap wire around the stem. You can cover the thin wire and floral stem with floral tape for a uniform look.
Step 8, Place flower arrangement into a pretty vase. I set mine on my bedroom night stand.
I hope you enjoy these as much as I do.
Saturday, September 4, 2010
Pickled Peppers
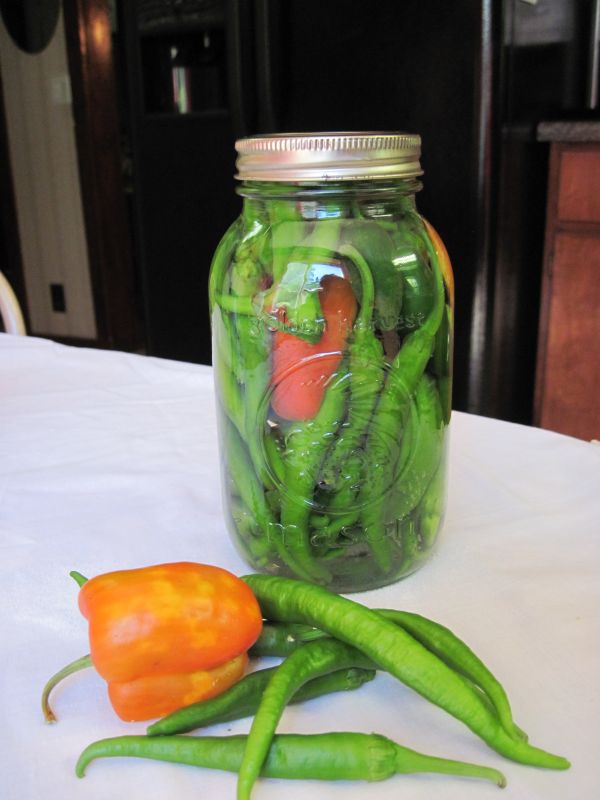
These pickled peppers are quick and easy to make. They will be ready to eat in about 3 weeks. They are fantastic to serve with Mexican food, over greens, or pasta.
You will need the following ingredients: 1 and 3/4 cups of vinagar, 3/4 cups of water, 1 teaspoon pickling salt, several green peppers and one red pepper for color.. You can grow your own peppers or buy them in the supermarket. You will need a measuring cup, sauce pan, teaspoon, clean quart mason glass jar with lid or a washed, glass pickle or jelly jar will do.
Mix vinagar and water into sauce pan and heat untill it starts to steam but do not boil.
Pack green peppers into the jar. Cut a couple slices of the red pepper and insert into the jar for color and eye appeal .
Add teaspoon of pickling salt in the top of the jar. Do not use table salt, because the iodine in the salt will darken the peppers.
Pour the heated vinagar and water mixture over the peppers into the jar. Then screw the lid tightly on the jar. Turn upside down a couple of times to distribute the salt.
Saturday, August 28, 2010
Crafty Keepsake
I made one of these pocket prayer books for each of my children and a few friends. Just a little something to remember me by. Its a good way to recycle old greeting cards. You will also need, blank paper, ribbon, glue gun, stapler, paper cutter, ruler and some short prayers of your choice, for this project.
I use the Word program with a setting of three columns per page to write the prayers. Write them to fit a small folded piece of greeting card, about 2 and 1/4 X 3 and 1/4 in size.
Using a paper cutter, cut the prayers out to be folded in half.
Fit the prayers together and fold in half. Next cut your greeting card portion large enough to fit the folded prayers into.
Next cut a piece of ribbon long enough to fit along the back to cover the staples and to bring inside the book to use for a book marker. Glue along the back ridge using a glue gun.
Press glued ribbon to back fold, covering the staples. Pull ribbon to center of book for a book marker.
If you have a long double page prayer put it as the center page. If you have another double page prayer, you can use a glue stick to glue it into the back of the pages.
Make a practice book, then make several to give to special people in your life. Below are some I have made.
Enjoy!
I use the Word program with a setting of three columns per page to write the prayers. Write them to fit a small folded piece of greeting card, about 2 and 1/4 X 3 and 1/4 in size.
Using a paper cutter, cut the prayers out to be folded in half.
Fit the prayers together and fold in half. Next cut your greeting card portion large enough to fit the folded prayers into.
Next staple the prayers inside the cover.
Next cut a piece of ribbon long enough to fit along the back to cover the staples and to bring inside the book to use for a book marker. Glue along the back ridge using a glue gun.
If you have a long double page prayer put it as the center page. If you have another double page prayer, you can use a glue stick to glue it into the back of the pages.
Make a practice book, then make several to give to special people in your life. Below are some I have made.
Enjoy!
Subscribe to:
Posts (Atom)